
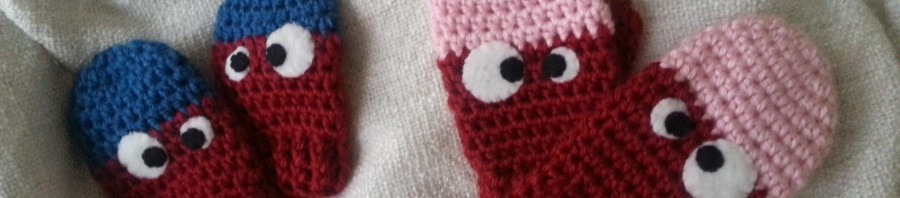


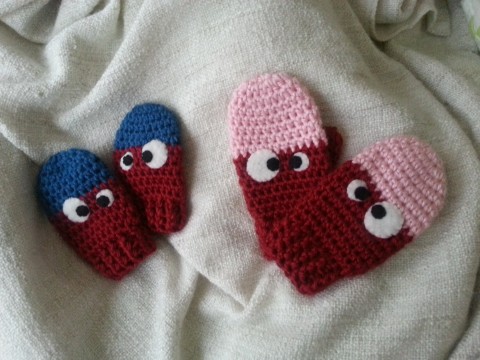
Free Crochet Pattern for Toddler Mittens – Monster Mittens
I hear from a lot of parents, grandparents and caregivers that it is very difficult to find gloves and mittens that will fit most toddlers. And it’s even harder to find mittens that toddlers actually want to wear! I originally created these mittens for my niece and nephew. My nephew was 13 month old at the time and was completely mesmerized by the eyes on his mittens. Mittens still fit and look great a year later! (I just checked last weekend)
REQUIRED SKILLS:
- Adjustable ring
- Basic stitches (chain, slip stitches, single crochet and double crochet)
- Simple color changes (stripes)
- Post Stitches
SIZE
To fit average 1-2 (3-5) year olds.
Finished measurements: 3.5 (4.5)” long, 4.5 (5)” circumference.
MATERIALS
Yarn: Worsted weight in 2 colors (MC1 and MC2). Samples shown were made using Caron Simply Soft.
Hook: US size G (4.25 mm).
Felt (white and black) for eyes.
NOTIONS: Yarn needle, stitch markers (optional, but helpful).
GAUGE: Approximately 5 sts and 4.5 rows = 1″ in hdc.
Notes: Both mittens are made the same way. Flatten mittens with thumbs on opposite sides to form left and right mitten.
PATTERN
Mitten
RND 1: With MC1 make an adjustable ring, 9 hdc in the ring, pull tail to tighten the ring – 9 sts.
RND 2: 2 hdc in each st around – 18 sts.
RND 3: [Hdc in next 5 (2) sts, 2 hdc in next st] – 21 (24) sts.
RND 4: Hdc in each st around.
Repeat rnd 4 – 1 (3) more times.
RND 6 (8): Hdc in each st to last 2 sts, sc in next st, sl st in next st.
RND 7 (9): With MC2, sl st in next st, sc in next st, hdc in each st across.
RND 8 (10-11): Hdc in each st around.
RND 9 (12) (thumb opening): Ch 3, skip next 3 sts, hdc in each st around.
RND 10-11 (13-14): Hdc in each st around.
RND 12 (15): Hdc in each st to last 2 sts, sc in next st, sl st in next st.
Cuff
For 1-2 year old size RND 1: Ch 2, [BPdc in next st, FPdc in next st] around, sl st on top of ch-2.
For 3-5 year old size RND 1: Ch 2, FPdc in next st, [BPdc in next st, FPdc in next st] around, sl st on top of ch-2.
Repeat rnd 1 – 4 (5) more times.
Fasten off.
Thumb
Join MC2 into the bottom right corner of the thump opening.
SET UP RND: Work 8 sc evenly spaced over sts of the thumb opening: 3 sc in chs, 3 sc in eachof skipped hdc and 1 sc in each corner. Place stitch marker in the last st made. The stitch marker is a new beginning of the round.
RND 1: Sc in each st around – 8 sc.
Repeat rnd 1 – 4 (5) more times.
NEXT RND: Sc2tog around – 4 sts.
Fasten off leaving 5″ long tail. With yarn needle sew/close the hole on the top of the thumb neatly.
Finishing
Cut out circles for eyes out of felt and sew them to the front of the mittens. Use picture as a guide. Large eye ball circle is about 1″ in diameter, small eye ball circle is about ½” in diameter, pupils ¾”.


6 comments
Skip to comment form ↓
Tania
November 26, 2014 at 10:59 pm (UTC -4) Link to this comment
First of all, thank you for this free pattern 🙂
But, did I miss it or did you forget to write down how the thumb part is worked?
Anastasia
November 27, 2014 at 12:54 am (UTC -4) Link to this comment
Hi Tania, you are absolutely right, I did miss it! Thank you for catching it, Thumb section has been updated :). I hope will make them!
Tasha
November 28, 2014 at 6:16 pm (UTC -4) Link to this comment
Hi, Thanks for the free pattern.. I just love these and my grandbabies will enjoy these as-well..
I do have a question.. Is there any way that I can save these as a Pdf.. Because I don’t have a printer…
Doinita
November 29, 2014 at 2:22 am (UTC -4) Link to this comment
Thank you for helping us out by posting explicit so!
Carol
December 28, 2014 at 8:47 pm (UTC -4) Link to this comment
Hi Tania, I was pleased to find your pattern. My little grandson is staying just one more night with us and today has been really cold, he has no mittens and I was asked if I could make some to match the monster hat I made him some time ago which is the only hat he will wear.
I have made one mitten already, but I had to make some assumptions, and I could be wrong. You haven’t said if the rows are joined, or if the mitten is turned and there is a seam to join. I don’t see anything about joining a seam, so I joined each row with a ss, and ch2 at the beginning of each row.
The part I really don’t get is on rnd 6(8) and rnd (7(9) the sc and ss at the end, and beginning. I did this but then the next row is hdc in each stitch. I worked a hdc in each stitch including the sc and ss from the previous 2 rows. What are these stitches tryng to achieve?
Should the thumb end up at right angles to the mitten as mine has? I feel I am missing the point here.
Thanks.
Carol
December 28, 2014 at 8:58 pm (UTC -4) Link to this comment
Oh also, after the thumb opening 3 ch row, I worked 3hdc over the 3 ch, and carried on with the mitten, it seemed logical.